A step-by-step street scene
Posted: November 3, 2017 Filed under: Uncategorized 77 CommentsA few weeks back someone asked me how much of a scene I draw in pencil before I add paint to my sketches. I haven’t had much time this semester for any instructional posts, but today I took some quick phone shots of the process so I could illustrate the steps.
Lately I’ve been finding places to sketch right near my school so I can paint as long as possible and then scoot over to class. This is the type of scene I often sketch on the way to work. Time spent sketching in the car for this one: about an hour. Time spent adding details at home: about 15 minutes.

The first step is to add some quick pencil lines. I chose this scene because I like the way all the utility poles on this street are leaning to the right. I don’t draw in a lot of details that I can add later with a brush such as writing on the street signs or details on the buildings. Just a general placement of things on the page.
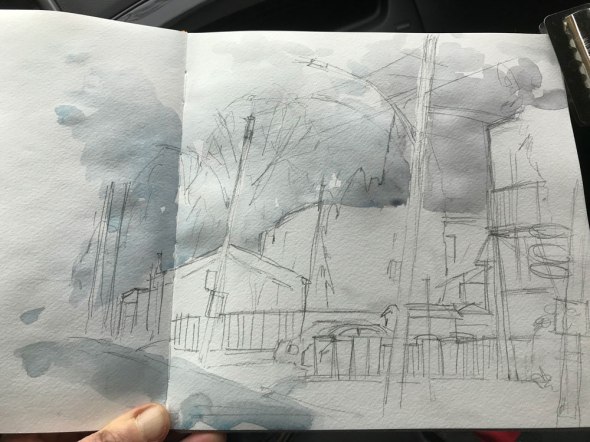
The first wash I put down is the sky and the road — both grey this week. I didn’t have time to draw in a full double-page spread but I did go over the middle of the book a little bit.

The next step is to add in the middle values, using a limited palette of Burnt Sienna, Alizarin Crimson, Phthalo Green and Quinacridone Gold (for that late autumn warmth).

After that I frame the little white building in the distance with some good darks, and I try to vary them as I go — gold to green to red to brown. I use a bit of blue for the trash cans and house shadow, and I start to add in some of the finer details but realize that my rigger brush is at home, and my class is about to start.
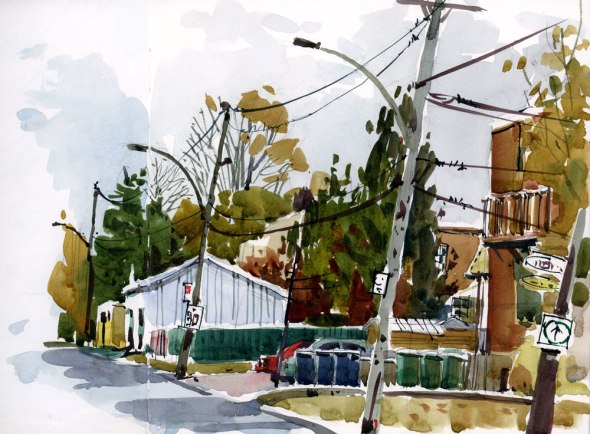
After school, I add in the details with a finer brush: the wires, the signage, and a few details on the buildings. Sketched in a Handbook Journal, 8 x 8″.
















A wonderful lesson. Thanks, Shari!
LikeLike
Thank you Christine!
LikeLike
Thank you for documenting this. Love it. You’re great at using every available moment. Hope u weren’t late for class.
LikeLike
Thanks Dottie. I made it to class on time!
LikeLike
Thanks Shari for showing step by step how you create your paintings. It’s really helpful for our practice and improvement🙏🏻💋
LikeLike
Glad you liked it Romy!
LikeLike
Super helpful, thank you Shari! I see how much the first grey wash lightens as it dries…
LikeLike
I’m so glad it was helpful!
LikeLiked by 1 person
I like how your paint puddles at the end of some strokes, and your sense of composition. Thanks!
LikeLike
Thanks Leslie!
LikeLike
Thank you!
LikeLike
Thanks for writing Helen.
LikeLike
Thanks so much. Really apprciated seeing your process.
LikeLike
I’m glad. Thanks for commenting!
LikeLike
Thanks for letting us see your process, this is important stuff!
LikeLike
So glad you liked it David!
LikeLike
What kind of paper exactly is in a handbook journal? Lovely sketch!
LikeLike
It’s pretty good watercolour paper Dee. Not sure if it’s 100% cotton, I suspect not, but it can take a beating.
LikeLike
Love this, I always add too much detail to the pencil drawing and then have to erase, or hope the paint will cover it. thanks for the step by step.
LikeLike
I’m glad it was helpful Sue. Thanks for letting me know.
LikeLike
And yet another, thank you! And,” this is important stuff.” Your step by step is most helpful.
LikeLike
Thanks Holly!
LikeLiked by 1 person
Thank you, Shari. This helps a lot!
LikeLike
So glad you liked it Helen.
LikeLike
This was fantastic, Shari. For a minute (just a minute!), I was thinking ‘this looks easy enough. I should try it.’ What was I thinking?! 😀 I will keep trying, but thank you so much for the step by step. It really helps me to have it broken down into little sound bites.
LikeLike
I’m glad it was helpful Lois!
LikeLike
Being the “someone”, thank you Shari for this illustration! Never even thought of using a rigger brush. I use pen after the watercolor is put down, but I find the sketch becomes less spontaneous. Excited to give this a try. 😁
LikeLike
Well thank you for reminding me to do this Belinda. It seems to have been quite popular!!
LikeLike
You are so generous to share. Some of your painted sketches look so ambitious, and now to see this step by step, it makes more sense. I especially appreciate that you included the amount of time it takes. This has been extremely helpful – THANKS!!
LikeLike
Glad you liked it Mary!
LikeLike
Amazing ! So much time and dedication for your sketches. Thank you for sharing your process You are such an inspiration 🤗
LikeLike
Many thanks Agnes!
LikeLike
Thanks, Shari, I enjoyed this! Question: do you take a photo to remind you of the details when at home?
LikeLike
Hi Marina, I did take a photo of this scene, but in fact I never looked at it again. I had enough info in the pencil drawing to complete the sketch.
LikeLiked by 1 person
Thanks! Interesting 😊
LikeLike
An excellent tutorial.
LikeLike
Glad you liked it Doug.
LikeLike
Thank you for taking the time to give us explicit examples of your painting from start to finish. You have a wonderful gift of sharing so that we may better understand and follow.
LikeLike
It was a pleasure to do this Bernadette!
LikeLike
Just marvellous. It’s great to see how little you put in with pencil and bring it all together with confident washes and bold strokework. Your work is always a real treat to view. Thank you for sharing this.
LikeLike
Thanks so much Ros!
LikeLike
Thank you very much – a brilliant lesson
LikeLike
Glad you liked it Anne! I love to do these but don’t always have the time.
LikeLike
Thanks for the lesson, well done , It is allways a good a reminder of how to do it properly.
LikeLike
Many thanks Andre.
LikeLike
I can only add another thank you for this lesson. You always get such good darks without overdoing. Learned to vary color from your Craftsy class but still working on this.
LikeLike
And I can only send another Thank You your way. Always great to hear from you Judy.
LikeLike
Love your unique style. Your brush strokes are instantly recognizable. I know it’s a Blaukopf without even seeing a signature.
LikeLike
That’s a good think Kevin, because most of my sketches aren’t even signed. I only sign the bigger watercolours. Thanks for writing!
LikeLike
Just exactly what I wanted and needed! Thank you so much!
LikeLike
Thank YOU Ren, for letting me know.
LikeLike
Thank you for this tutorial! I’m curious…how do you scan your work from your sketchbook? Your photos look so good.
LikeLike
HI Deane. I scan my work on an Epson Perfection Scanner and then do a few adjustments in Photoshop, mostly to add the contrast back in and to whiten the whites. I try to match the art as best I can, and the scan is usually a bit flat. Of course in this series the first four images are iPhone photos and the final sketch image is from a scan.
LikeLike
Thanks so much for this Shari! VERY helpful.
LikeLike
I’m glad to hear that! Thanks for letting me know!
LikeLike
Thank you so much for the detailed information. Just what I need!
LikeLike
Glad it was helpful Connie!
LikeLike
That was very cool! Tim
>
LikeLike
Many thanks Tim!
LikeLike
That was so helpful! I eas able to see how you preserve the whites ! Please do that more often 🙂
LikeLike
Thanks Chrissa. I will try!
LikeLike
love this!
LikeLike
Thanks Gil. And I just looked through your Italy paintings. So beautiful!
LikeLike
Wow thanks for that Shari, what an amazing place that is!
LikeLike
I love this…u are amazing..keep it up
LikeLike
Thanks!
LikeLike
Shari, thanks for showing your steps! I loved seeing how that very grey sky was toned down after you added the tree color. This is lovely!
LikeLike
Yes, the sky seemed dark at first, didn’t it. It was interested for me to see that too.
LikeLike
Appreciate the step by step tutoring, as I tend to add way too much detail into my sketches. This is helpful.
LikeLike
I’m really glad to hear that April. Thanks for letting me know.
LikeLike
[…] via A step-by-step street scene […]
LikeLike
Wow, that was really helpful – thanks!
LikeLike
I’m glad that was helpful Gina. Nice to hear from you and I hope all is well.
LikeLike
Very well, thank you, and in the process of moving back to Montreal.
LikeLike
Thanks for sharing your technique, Shari. Its always helpful to see how someone develops their sketches. Occasionally do you use ink instead of pencil? Or would you use ink for fine details in the final stages?
LikeLike
HI Michael, Thanks so much for writing. I often use ink instead of pencil, but I am much more comfortable with a pencil in my hand than a pen. I don’t often use ink for final details because I find that they black ink just sits on top of the watercolour. Instead I prefer to mix the darkest colour I can with watercolour. If I combine Alizarin Crimson and Phthalo Green that makes a black that is dark enough and yet seems to be more harmonious with the rest of the sketch. I learned that combo from taking an oil painting class, but it works well with watercolour too. I use a finer brush too when I add in those very dark details. I hope that helps. Shari
LikeLike
I like it best in the stage before last when everything is blocked in but there are holes. It makes it feel like it has area behind it and that the grey day goes on forever.
LikeLike