Messing around with gouache, step-by-step
Posted: September 23, 2018 Filed under: Uncategorized 19 CommentsAfter I posted my pegboard gouache sketch the other day Donna asked a few questions in the comments sections and I thought it might be better to create a new post to answer her in case this is useful info for anyone else. Disclaimer: I am not gouache expert. This is just my own muddling around on toned paper so feel free to use the info or discard as you see fit.
Here are Donna’s comments:
“I just took a class about gouache and would be interested in details about your materials. Do you use tube gouache or mix white with watercolor? My goal was to use gouache in my sketchbook but I still feel very lacking in knowledge. This instructor mixed gouache with watercolor which is complicated to do in the field. Gouache squeezed from the tube hardens so fast. What to do?”
I thought the best way to answer the question about how I use gouache would be to take a photo. I have some tubes of Winsor & Newton gouache that I found in a sale bin at my local art store, maybe about ten basic colours in all (including white and black). I don’t mix them with watercolour. I like the flat look that gouache has, and I find it fun to play with the water ratio to get different transparent and opaque washes. I squeeze out only a bit of paint on a Jasper butcher tray — as much as I need for one sketch — so I am not really worried about the paint getting hard. There are techniques sketchers use who paint with gouache on location, such as leaving a damp sponge in the palette, but so far I haven’t used any of those methods. This is mostly a studio activity for me, for now.

I work in a Stillman & Birn Nova Series softbound sketchbook with beige paper, size 8.5″ x 5.5″. There’s also a grey paper you can use but I like the warm undertone of this one.
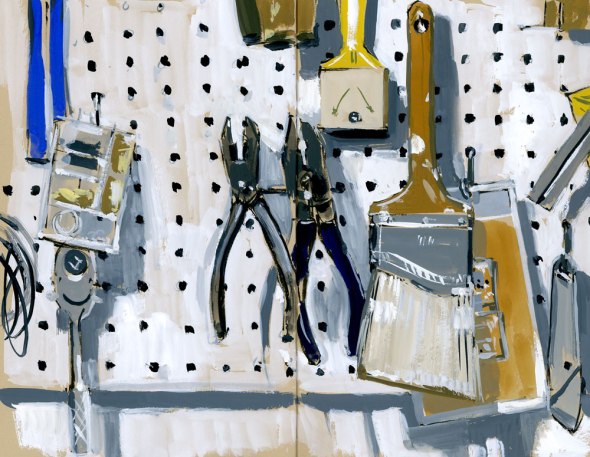
My first step is to draw with a brush pen filled with permanent ink. I am not too worried about the accuracy of the drawing since gouache allows for lots of corrections. You can see where I messed up the handle of the wire cutters but I just drew it again, knowing I would be able to paint over the lines.

For this sketch I used a limited palette of gouache colours: Raw Umber, Cadmium Yellow, Cadmium Red, Ultramarine Blue plus Black and White. My first step is work on the general big shapes for the tools. The butcher tray is perfect for mixing small puddles of gouache. I use old brushes for this — gouache can ruin good brushes if left to dry, so I use old Escoda Perlas that have lost their points. Stiffer brushes are better for this than floppy ones like squirrel mops.

My next step is to paint in the shadows. Don’t really know why I do that instead of painting the pegboard first, but somehow I want the shadows to be on the clean paper, not painted on top of another layer of paint. And also, since I don’t really know what I am doing with this paint, I am going by gut feeling more than anything.

The last step is to paint the white pegboard, the dark holes and the edges of things. Some of the shadows are too dark so I go over them with a lighter wash. Each stroke is a bit of surprise since gouache gets darker as it dries. The last details are the most fun: the little white and black highlights. The challenge for me with gouache is the reversal of my usual thinking process about values, because in watercolour I work from lightest to darkest most of the time. With this I start somewhere in the middle and work towards darks first and then add in the lights. It’s also in some ways a more painterly process since the paint can be applied more thickly and the brushstrokes are often more apparent.
Anyway, that’s enough rambling for now. Give it a try if you have some gouache hanging around. And if you want to see someone who uses gouache in a much more expressive way, have a look at Maru Godas’s work. I took a fantastic workshop with her in Porto this summer, and I will be posting my sketches from that soon.


Interesting presentation and I like the end results. Good reminder that gouache is usually opaque unlike watercolor. Thanks for doing this. Frank B
LikeLike
Thanks Frank. If you find this useful, I’m happy to hear!
LikeLike
Thanks, helpful as always.
LikeLike
Thanks so much Jim.
LikeLike
I would have though you would have painted the white peg board first. Since gauche is basically Opaque. What do I know? This is a great email. thanks.
Tim
>
LikeLike
What do I know Tim?? I am just experimenting with this. There’s probably a dozen better ways to do it!
LikeLike
In my class we painted our page a staining color first so bits could show through as desired like your beigh paper. I’ve got to get some tubes of gouache and start at home as you did. Thanks so much for showing how you mess around. You got great results! You are so generous to do this.
LikeLike
I’m glad you prompted me to do it as well Donna. It is always a good exercise for me to articulate the steps.
LikeLike
Really appreciate you expressing your thought process as you went along. Not sure that I am ready for gouache, but enjoyed reading about your experience with it! And, love the finished product! Nice painting!
LikeLike
Thanks Marie. I’m glad it was useful.
LikeLike
Thank you so much for this brilliant demo…I am going to have a go with your technique!
LikeLike
Glad you liked it Agnès!
LikeLike
This is so interesting as I have been using gouache for some time now. I like it also as it dries faster then watercolors do. And I don’t just use them opaquely. I am going to use your method of squeezing out just what I plan to use on a tray as they do dry out and crack in a palette. (Not all do tho)
Thanks for this post. Your painting is really full of movement and life. Who would’ve thought so with the subject matter.
LikeLike
Thanks Judy. Glad I gave you some ideas of how to use it.
LikeLike
just bought a cheap gouche set on sale recently. Haven’t played with it yet. Interesting points to ponder when I managed to get to it. Thank you
LikeLike
I’m happy to hear that I might have given you some food for thought!
LikeLiked by 1 person
So helpful! Thanks for taking the time to answer these questions in a full post.
LikeLike
Thanks for the demo.
LikeLike
Thanks for explaining your process and showing your steps.
LikeLike